Wednesday, November 23, 2011

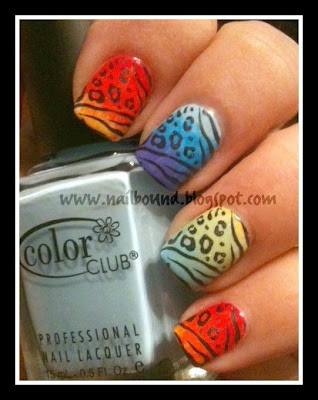
Taste the Leopard Rainbow

Hello all!  Today for you I have an awesome rainbow and animal print nails.  I got the idea from one of my most favorite bloggers, the ever so lovely Christina at Let Them Have Polish, of which you can view here

And here are mine (sorry for the crap-tastic cell phone pic).

For the pinky & pointer fingers I used:  Color Club (aka CC) Warhol, CC Poptastic, CC Wham! Pow! & CC Almost Famous

Ring (and thumb but not shown here):  CC Almost Famous, Sally Hansen Insta-Dry Chartreuse Chase, CC Twiggie, CC Factory Girl & China Glaze Bahamian Escape.

Middle Finger (also my favorite):  CC Factory Girl, CC Chelsea Girl & CC Pucci-licious

I sponged all of these colors on using a make-up wedge.  I then stamped the leopard print image on using Konad black pearl and image plate M78.  I then topped it off with Seche Vite

This was so fun and looked so awesome in person that I can't wait to do it again!

Hope everyone has a wonderful, turkey-filled & safe Happy Thanksgiving!

Friday, November 18, 2011

Pink Feather Mani

I've seen this on several other blogs and so I thought I'd try my hand at it.  I'm not sure if I like it or not...

I used China Glaze Purple Panic for the base color and the feathers I purchased at Michael's.
Hope everyone has a great weekend!


Monday, October 31, 2011

Essence No More Drama

Hey there all!  Today I have for you Essence Colour & Go nail polish in No More Drama which is the perfect lavendar creme color.  This is either 1 or 2 coats, sorry I can't remember. :)  Anyways, on the ring finger (aka accent nail), I added a little nail art with some Cinapro nail art stuff I purchased from Sally's awhile back.  I think those are supposed to be teardrops but since teardrops made me sad and I like to be happy, I turned them in towards each other and made a flower.  Hope you like & have a great day!

And here it is from another angle:
 So what do you think?  Have you ever used any of the Essence products?  Some of their products are available at Ulta and may I add that the prices are so low they're insane!  I have several in the Colour & Go line and so far have loved them all.  I only wish we could get more of their products here in the US.  :(

Friday, October 28, 2011

Holographic Halloween Nail Art

Sorry I haven't posted in quite awhile but life is just always so very hectic and I don't see it slowing down any time soon.  I don't even know the next opportunity that I'll have to post.  lol  Anyways...
Although I'm not a fan of Halloween, here is some halloween-themed nail art I did.  The base coat is Essie Mesmerize, which is the perfect cobalt blue and then for the designs I used Nfu Oh #61.  Unfortunately the sun was never out when I had this on so all I have for you are indoor pics and therefore doesn't show the holographic beauty of Nfu Oh 61.
Pointer & Ring Fingers:  Konad plate M65
Middle Finger:  Pumpkin - BM222; Bat - BM13
Pinky Finger:  Spider Web BM13

On my thumb I had the skull from BM211 but I forgot to take a pic of that. :(

Tuesday, April 5, 2011

For Pink Out Loud!

This post will be short & sweet word-wise but very pic heavy!  Who are we kidding?  We're here for the pics, aren't we?  =D

This is Milani's Pink Out Loud over black ~ Orly's Liquid Leather.  Just look at this layering awesomeness!


Well, what do you think?
Do you have of any good layering combo secrets you'd like to share?

Wednesday, March 30, 2011

Milani Nail Polish Review: Pink Out Loud

Hello faithful followers & new followers as well!  I apologize for not posting as often as I had been but life has been crazy lately.  I won't bore you with the details - we all know why we are here - nail stuff! :)

This polish was sent to me by Milani to review - it is Pink Out Loud 118. 
Milani is a nice drugstore polish - one of the better lines available I might add.  This is a nice soft pink with some beautiful glass-flecked gold shimmer.  In real life, this color falls in line quite nicely with Pantone's 2011 Color of the Year.

At first glance I thought this polish was going to be too sheer but to my surprise it wasn't!  It did require more than 1 coat but with all the glass-flecked shimmer keeping your eyes busy you could probably get away with doing 2 coats.  However for these pics I did 3.  I also tried 1 coat over a black polish and it looks absolutely stunning!  I will add pics of that soon!

Color:  Great (not to mention stylish with it being the "now" color)
Finish:  Great
Application:  Normal
Wear:  Below normal
Opacity:  Surprisingly Normal
Smell:  Normal
Price:  Cheap

The bottom line?  I definitely give this polish an A.  It would be an A+ but I had tipwear within just hours of application (and yes I used a top coat).  I have a few more Milani polishes to review so I will try a different base/top coat with them and if I find out it's the chemistry between the combos, I'll add a revision/edit letting you know.  Stay tuned for the next review coming in a few days!

Tuesday, March 8, 2011

Review: Incoco - Dry Nail Applique

Good evening all!  Sorry for not posting lately but I've been reviewing a product that was sent to me and I wanted to test it out to its fullest.  It is Incoco Dry Nail Appliques.  Basically it is nail polish strips that are made out of 100% nail polish that is 95% dry.  The company describes it as a "base coat, color & top coat in a single dry self-stick nail polish strip".  They also state you can get up to 14 days of wear out of one manicure.   

Most of you have probably seen the Sally Hansen Salon Effects nail stickers but Incoco's product has been around a bit longer than SH.  It is reported that the SH version has nail polish embedded into theirs.  But, you know when you've printed something on paper and you spill water on it how image become's blurry?  Well that's how the SH ones appeared to me - not nearly as clear as I had seen advertised.  There is also a more expensive professional version called Minx that is offered at some salons - this apparently is a hit with celebrities. 
 
The items Incoco sent me are (in order of appearance in the below pic):  Silver Glitter French tips, Urban Jungle (blue w/zebra stripes) & Crème de la Crème (light pink cross-hatch), polish removal cloths, and adhesive-backed foil strips.  The adhesive strips are so you can reseal the packets so that the leftovers don't dry out and you can use them at a later date.


Notice how they are different sizes on the end of each strip.  Once you find the one that is closest to the size of your nail, there are a few tips that really help in applying these.  Warm the strip up between the palms of your hand - a few seconds is all that is needed, and this will make it more pliable.  If the size you've chosen is too wide, you can narrow it by gently stretching it vertically.  If it is too narrow, you can widen it by gently stretching it horizontally.  And when I say gently, I mean gently.  If you're not too careful, you could rip it - keep in mind that this is 100% nail polish (also please note that there is a faint nail polish smell when you first open the packet so that's another plus - no lingering nail polish fumes for those who are bothered by it).  I use a combination method of trying to center the strip on my nail at the tip or if that doesn't work, I try going side to side while keeping it right at the cuticle at the same time.  Once you have it applied to your nail, make sure to press it down on your nail and smooth out any bubbles.  Then you will take a nail file (I just used a cheap cardboard-backed emery board) to the tip of your nail and gently file the strip in a downward motion and the excess just falls right off. 
Indoor Lighting
And here's a blurry pic to show you the pretty glitter:
Note the tipwear in the above pic.  This was after 4 days of wear, which for me is a good length of time.  It's a bit more obvious in this pic than it was IRL.  Oh & don't get me started on the removal process - I'll just call it a "glitt-tastrophe".  Nothing that a little aluminum foil & pure acetone for a few minutes couldn't take care of. :)
Application gets better with practice so the more you do them the better you'll get.  However, in saying that, I personally would save these for a very special occasion because they are gorgeous on but are quite expensive comparatively for just one manicure vs. a whole bottle of salon-brand nail polish.

Their products are available for purchase online at incoco.com.  They also used to be available at Walgreen's but I guess that doesn't matter anymore since they no longer carry them. :(  Here is a pic of the set of French tips I purchased at Walgreen's back in the Fall.  The day I took this pic my nails felt like posing with a personalized calendar a vendor for work had printed up & sent to me. 8^)
So what do you think?  Have you tried them?  If not, do you think you will?  Let me know!

Quote for the day:  "Faith is a living and unshakable confidence. A belief in God so assured that a man would die a thousand deaths for its sake." --Martin Luther
Monday, March 7, 2011

Giveaway I've entered!

One of the blogs I follow "Let Them Have Polish" is having a giveaway that I've entered here!  She has all sorts of wonderful konad ideas!

Wednesday, February 23, 2011

Freehand Funky French on the Diagonal

So if you can't tell by my boring title names, I'm not really a creative person.  It may appear (at first glance) that I am and I truly wish I were but for the most part all I am able to do is take someone else's idea and try my hand at it.  I've had my creative moments but I'm just not yet brave enough to show those because most are fails.  Maybe some day. ;)

One of the many cool things I've come to find out about nail art is that the love for it is universal.  While the taste may vary from culture to culture or even person to person, you don't necessarily have to know the language of the individual to "get the picture".  A lot of blogs and youtuber's I subscribe to are in other languages & I don't speak a darned one of them - I only speak English. :(  The reason I say all that is because today I have for you my take on a funky french that I saw here, which is not in English, but here is the pic of my nails:

For the base coat I used Gelous that I purchased at Sally's Beauty Supply.  I then freehanded the black which was LA Colors nail art w/the striping brush in black.  Once that dried I used Sally Hansen White Out and a toothpick (I didn't have any dotting tools yet) for the white dots.  Then I alternated smaller dots on top of the white in blue (cannot remember the polish I used - sorry!) & a purple-pink neon China Glaze Purple Panic.  I then topped it off with Seche Vite.  I believe this is the 1st freehand nail art mani that I've ever done & it's still one of my favorites! 

Another cool thing about this mani is that it was super cheap to do so if you're looking for a neat way to spice up your nails without having to pay salon prices or buy special tools then this should be right up your alley!  The LA Colors nail art polish I got at one of my local dollar stores for $0.99, a toothpick and 2-3 other colors is all you really need to accomplish this look.

Hope you like!  Have a great day fellow nail polish lovers!

Friday, February 18, 2011

Across the Universe - Deborah Lippmann

A few days ago I posted about my precious hubby surprising me on Valentine's Day with one of my most coveted after nail polishes - Deborah Lippmann's Across the Universe.  From what I've read on her website, Deborah Lippmann loves music (she even has a few cd's out) & she names some (if not all) of her polishes after songs.  This one is named after The Beatle's song Across the Universe. 

I tested this polish with 3 different base coats:  Zoya Anchor, OPI regular base coat & some generic kind I got at Sally's Beauty Supply.  I got the least amount of shrinkage with the OPI so I went with that. 

This polish is a navy jelly with aqua micro glitter and the bigger hex glitter of green and blue.  It makes me think of a mermaid or the deep ocean or maybe even the universe. ;)  For the top coat, I didn't go with my old faithful Seche Vite because I had read on another blog somewhere that the 2 didn't play nice with each other.  I used Orly Polishield on my left hand & Zoya Armor (no drying drops) on my right so I could see which one held better.  I had just the slightest bit more tip-wear with the Zoya but I am right-handed so I think they were both an even match.

As thin as this polish is I was surprised that it was opaque in 3 but it was and most definitely worth it!  I'm going to wear this for as long as I can because it is so awesome.  *Edit:  It wound up lasting 3 days which is a long time for me.
Photo taken outdoors at sunset.
See how sheer it was @ 1 coat?
Sorry for the crappy lighting - not sure what was going on...
Deborah Lippmann's nail polish is on the expensive side ($18/bottle) & is available at Nordstrom's, Neiman Marcus...you get the picture.  While I do love love LOVE my nail polish, that is quite expensive IMO & I would never buy that for myself & that is why it is so special to me.  Do you own any of her nail polishes?  What are your thoughts?

Thursday, February 17, 2011

Polka Dots!

Hello everyone!  Today for you I have polka dots. I went through a phase where I hated polka dots but I don't anymore!  For this mani I used one of those tiny Sally Girl polishes in no-name lavendar as the base color (which was opaque in 1 coat!) & for the stamping I used the Bundlemonster "fauxnad" plate bm21 and the stamp color was also a Sally Girl no-name polish in a dark(er) purple.

Tuesday, February 15, 2011

Water Marble using Color Club: Pure Energy & Factory Girl

Hello Readers!  This is a water marble I did (the only one so far, actually) using 2 different shades of blue from Color Club.  One is Pure Energy which is an aqua blue with some green shimmer & the other is Factory Girl which is a light blue creme.  I was trying to recreate what the awesome Nihrida did here.  If you haven't checked out her blog yet, do so.  She is awesome. 

Here is my rendition:

OPI - Do You Lilac It?

Today for you I have OPI's Do You Lilac IT? with Nubar 2010 on top, Konad m51 using Konad special polish in purple for the design & the little flower on my ring finger came in a packet I bought at Sally Beauty.  I must be in a purple mood lately because it seems as if all the mani's I've done as of recent are purple.  DYLI was opaque in 1 coat - yippee!  When I first saw Sally Hansen Hidden Treasure I knew it was a must-have, then I saw it was LE & going for $20 on ebay, I about died.  Sally Hansen for that much?  You have GOT to be kidding me!  Anyways, I found out that Nubar 2010 is an almost exact dupe so I got it for much cheaper.  This is the 1st time I've actually worn 2010 on a mani because it is so very special to me that I wanted to save it for that special color & to me this combo is perfect so here it is in all its glory!
Then I mattefied it using Essie Matte About You (sorry for the crappy pic):

And here is a pic of the Nubar 2010 - just look at that rainbow of beautiful flaky goodness!!!

Monday, February 14, 2011

Happy Valentine's Day!!!

Well, today is Valentine's Day & I just couldn't pass up doing a romantic mani!  I used Konad plate M19 to do the french tips with Konad special polish in white.  I don't have this technique perfected yet so I had to go back over it freehand with Wet 'N Wild in French White Creme.  Once that dried, I used one of those Sally Girl nail polishes that are really tiny that you get at Sally Beauty Supply for like $0.99.  The only thing I don't like about them is that they don't have names!  It was light pink in color & had a creme finish.  Once it dried, I added the kiss design from bm02 with an old Sinful Colors nail polish in Crazy Red.

And this is one of the presents I received from my hubby for Valentine's Day!  He is so thoughtful - I have the best husband!!!  He is so supportive of me with my whole nail polish/nail art obsession!  This is my first Deborah Lippman polish.  If I hadn't spent so much time & effort on the kiss manicure, I would have put this on straight away!  I cannot wait to wear this - it is absolutely breathtaking IRL.  It makes me think of a mermaid's tail. 
The other gift he got me was the full-size Zoya Color Lock System.  During their 3-free I purchased the mini version & fell in love - especially with their nail polish remover.  I'll get more into that later!  Oh & I received some products over the weekend to review so stay tuned!  Lots of fun things coming soon!!!

Happy Valentine's Day for those of you with someone & Happy Single's Awareness Day to those of you without!  May you all be happy & blessed on this beautiful day!

Tuesday, February 8, 2011

Tie-Dyed Freehand Mani

My most favorite music era is the 60's & 70's, with my most favorite band of all time being Crosby, Stills, Nash & Young (and don't forget Taylor & Reeves). 

All of that hippie, tie-dyed stuff is my fave so I have to share with you today my tie-dyed nail art.  My inspiration comes from a Nail Art youtube video by Dollface22772 which can be found here:  http://www.youtube.com/user/Dollface22772#p/search/3/NN08dNoUuGg
And here are my results:
This was a lot easier than I expected it to be. 
I just picked out polishes with a creme finish: 
     Red - unknown
     Orange - Wet n Wild in Sunny Side UP
     Yellow - Sally Hansen Xtreme Wear in Mellow Yellow
     Green - Sally Hansen Xtreme Wear in Green with Envy
     Blue - Sally Hansen Xtreme Wear in Blue Me Away
     Purple - Finger Paints Amethyst Atelier

I painted each nail one-by-one & did the colors in rows like they would be in a rainbow.  While they were wet, I ran a toothpick through it starting with the red going out through to the purple.  I topped it off with Seche Vite and there you have it!

Skin, Cuticles & Zoya Kelly

I have horrible cuticles & dry skin.  I also don't drink enough water & that's probably the problem but I just can't drink it - ugh!  I bleed Dr. Pepper.  I've recently discovered 2 new things that are working on my skin and cuticle.
First, this wonderful lotion here:
I love Carmex lip balm so you know that I freaked out when I found out about this!  It says that it's non-greasy & it's actually true!  A little goes a long way & that lotion-y feeling is gone as soon as you rub in the lotion.  I now swear by this stuff!

Next is a tip I found on the laquerista's blog where you take an emery board and file the skin on the sides of your nails.  I tried it & found that it made a difference instantaneously!

Just so that this post isn't without nails, here is Zoya Kelly which is an awesome dark grey creme with a purple tone to it.  I absolutely love this color!  It is opaque in 1 coat & I've seen on Zoya's facebook that fans have used it to stamp with.  I can't wait to try that - maybe this weekend!  I only did an accent nail, using the leopard print from Konad plate m57 with Rimmel 60 Seconds in Grey Matter, which is awesome for stamping!
Until next time, have a grey(t) day!  :)

Monday, February 7, 2011

Matte-fied Monday with Avon Mirror Shine

Hello all & Happy Monday to you!  I know everyone hates Mondays & I do too so I try to think of Monday as a person, you know the underdog that is very nice but no one likes & it's for a reason that is out of the underdog's control?  So I try to give Mondays a break.  Sorry for going so off-topic - back to the nails!

Today for you I have Avon Mirror Shine in dark purple (cannot remember the name but will update w/it later) & I stamped using Avon Mirror Shine in silver (will also update this later w/the name) & I used Konad image plate m78.  There's two awesome things about these Avon chrome polishes:  they are 1-coaters & they stamp.  I've learned that usually if it's a 1-coater then it will stamp, I haven't found one yet that won't!

So here it is in it's shiny chromaticness (and I think I just made up a word!):
And here it is mattefied:
It's kind of hard to tell but both of these pictures were taken in the same amount of sunlight - indirect through my kitchen windows.

Which way do you like better?

Friday, February 4, 2011

Funky French Friday

I apologize - I know a lot of nail bloggers out there do a Funky French Friday but I just can't help myself!  So I was thinking I could do something different though - I thought about doing a theme called "Matte Monday".  What do you think?

Anyways, today I have for you the Petites Raspberry Ice for the french tips using Konad plate M19.  For the base coat I used Artificial Nails that I purchased at Sally Beauty Supply.  Enjoy, have a great weekend & see you soon!

Thursday, February 3, 2011

A few different mani's...

This post is going to be a little pic heavy with a few mani's I've done for my mom. 

For the 1st one here, I can't recall what the base color was but it is a gorgeous vampy red.  I used Konad plate m64 and the white special stamping polish for the design.

For this mani, she wanted to try tone-on-tone so we decided to go with a sheer white nail polish by Wet 'n Wild that I borrowed from my husband's niece - it didn't have a name & for the design I used a fauxnad plate made by Bundlemonster, bm19.

And the final one for now, I used an old nail polish I have in my stash, Almay 'One Coat' & the color name is Cashmere.  This polish smells awful but on the plus side, it is a 1-coater (& it also works great for stamping!).  For the design I used Konad plate m78 & special stamping polish in black.
Enjoy & have a great day!

Wednesday, February 2, 2011

OPI What's with the Cattitude?

Some of you may not know this but my favorite color is blue, pretty much in any shade, but my most favorite blue is so hard to describe.  It's like a neon baby blue.  So when I saw this color, I just knew it was "my color".  Well, let me tell you how disappointed I was in this polish.  It took 6-8 layers to become opaque which angered me for 3 reasons (but are kind of the same?):  (1) the less coats it takes, the less time it takes, the happier I am; (2) I hate seeing VNL (visible nail line) & (3) OPI polish is too expensive to have to use that much polish; I mean, for $9/bottle I expect more than I do from the cheapo drugstore polishes.  It seems to me that creme polishes are the worst for this.  Anyways, this is OPI's What's with the Cattitude? from the Shrek collection.  The design is from Konad plate m73 & Konad black stamping polish.

After doing this mani, I found that using a white under these problem polishes not only makes it easier for these to become opaque but it also makes the color "pop".  If I ever again have 8 hrs to spend on a mani, I might try it.  We'll see...

Tuesday, February 1, 2011

Heart French Mani

Hello all!  Since we're now in February, I thought I would share a heart french mani with you as Valentine's Day is right around the corner.  For the base coat I used Artificial Nails that I purchased at Sally's, which gives your nails that "artificial nail look".  I also used Konad plate m80 and the special stamping polish in white.
Do you have any special plans for Valentine's Day?  I'd love to hear them!

Monday, January 24, 2011

Base, Color & Top Coat Mis-Match...or is it the weather?

Over the weekend I did mine & my mom's nails but 1st, let's look at my mom's:

I used CND Stickey as the base coat with 1 coat of Petites in Raspberry Ice.  I love polish that is opaque in 1 coat but they are so rare!  I have come to realize that the opacity is not based on brand as I initially thought but basically it's based on the pigmentation of the color itself. 

Anyways, this color is a hot pinkish-magenta with some shimmer & I love it!  I'd gotten some inspiration from Scrangie (who I consider to be one of the top guru's in the nail polish world) http://www.scrangie.com/2011/01/cover-girl-iceslicks-anti-freeze.html.  For my mom's mani I put 2 coats of Cover Girl IceSlicks Anti-Freeze on top of the hot pink and it is fabulous!  On a nail wheel I tried Anti-Freeze over China Glaze's Goth & it looks amazingly awesome (like outer space) but I just don't think black would be appropriate for my mom - she would feel very out of place.  This isn't the best pic because it was so hard to photograph but the blue glitter gives off an aqua/purple shimmer & I love it!  It took absolutely forever for the 1st coat to dry but once we got the 2nd coat on, we topped it off with Seche Vite.  You may ask, what's the problem?  Well, in less than 24 hrs after giving her this mani, it started to chip & there was shrinkage at the tips.  I even buffed her nails to get the shine off so that the polish would adhere better!  I think I'm going to start keeping a list of base coats, polish brands & top coats that don't play nice because after all this hard work, I don't want it to happen again.

So after I did my mom's nails, I did my own.  I used Nailtek Foundation II for the base coat & China Glaze Bahamian Escape (also a 1-coater!).  I added Konad to it from plate m50 using the Konad special polish in purple & topped it off with ole faithful Seche Vite.  And guess what - mine started peeling off within 3 hours!  That's just ridiculous.  My sweet husband even washed the dishes for me & I was in church most of this time so it's not like I was doing some type of manual labor that would ruin my mani.  Ugh!  I was so aggravated!!!  I was able to touch up most of it so thankfully it was hard to tell but then it started peeling again within just another few hours! 
Later I added a purple rhinestone to the ring finger as an accent.  This pic was taken after I'd touched it up for the second time & this time around the touch-ups are definitely more noticeable (see pointer finger in the top corner).  Btw, all pics are clickable so you can enlarge for more detail.
So I have a few questions for you:
Which do you like better, with or without the rhinestone?
What do you think caused these issues?  The interaction of these polishes, the weather, the user? ;)
Have you experienced anything like this?

Friday, January 21, 2011

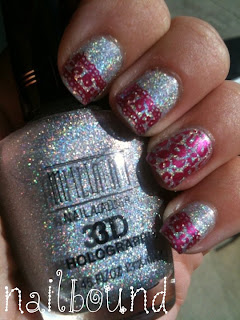
Disco Leopard: Milani HD & Konad m57

Hello all - it's me again!  Today's mani I have for you is "down with the funk".  I used Milani's HD holographic polish in HD for the base color & Sally Hansen chrome nail makeup Carnelian Chrome for the stamping & the design comes from Konad plate m57.  The holo-ness in the Milani shows up really great in this pic (the sun was out for about 10 seconds) but not as much as I was hoping IRL.  Oh well, I guess I'm going to have to break down & buy some of the Nfu Oh holo's! 


I was definitely feeling the "jive" when I did this. lol
Have a great day readers!

Wednesday, January 19, 2011

Zoya Harlow & Konad m74

It's me again dear readers!  I have for you now the awesomeness that is Zoya Harlow (2 coats).  Harlow is part of their matte velvet collection which they describe as being "Rich saturated plum rose packed with sparkling metallic shimmer in a velvety matte finish. A perfect choice for fall or winter that combines rich color with a hot matte finish."  I just love this color and the finish is amazingly awesome in person.
                              
The other matte velvet colors in this particular collection are Posh which is a red & Savita which is a velvety beautiful purple.  Zoya has another matte velvet collection which consists of Veruschuka which is a green velvet, Loredana which is a medium gunmetal grey & Dovima which is a darker charcoal black.  I own all of these except for Verushchuka - I'm just not that into greens (yet).  These are in my untrieds so I'll have to put them on my to-do list fo sho!  You can purchase Zoya nail polishes from any salon or spa in your area that carries their product or you can purchase directly from their website at artofbeauty.com.  I have to say that my experiences with Zoya polish so far have been amazing but that's a whole other subject for another day - maybe for when I have more Zoya swatches to show you.  :-P

Anyways, back to the pic.  The design comes from Konad m74 and the polish I used was LA Colors no name black that I got at the Dollar Tree.  At first I didn't think it would stamp because after I scraped away the excess, nothing appeared to be left in the design but don't let that fool you!  A friend of mine had told me about it and it does work!  It doesn't stamp as black as the Konad special stamping polish in black does, it stamps more of a charcoal'ish shade, which is fine by me.  This also doesn't leave nearly the mess on my cuticle/skin area the way the black Konad polish does which is another plus!  Which reminds me, please ignore my horrible cuticles - it is the middle of winter so cut me some slack.  Anyone have any suggestions for cuticle care?  I'd love to hear them!

China Glaze Secret Periwinkle & Konad m64

Hello all!  Today I have for you one of my most favorite mani's I've ever done.  This is China Glaze Secret Periwinkle (2 coats) with design from Konad plate m64 stamped on top with the Konad special polish in white & of course topped off with Seche Vite fast-drying top coat.  I started to add white tips to this because it would look fabulous.  Maybe next time...

Tuesday, January 11, 2011

Color Club De-Luxe-Cious & Konad m65

Hello again!  Today I have for you Color Club's De-Luxe-Cious and Konad stamping from plate m65 in the Konad Special polish in black.  I had some application difficulties with De-Luxe-Cious but once I tweaked my application process a few times, I finally mastered it.  It would seem to dry on the brush before I could get it on my nail so I had a bit of cuticle drag. 

I believe this is 2 coats and then topped it off with the konad stamping and Seche Vite fast-drying top coat (which is my all-time fave).  I call this design dizzy nails.

Have a great day!

Monday, January 10, 2011

My 1st Post

Well here goes nothing...

I've been debating for quite some time now (September 2010 actually) on how to start out my blog.  I have no clue what I'm doing so please be patient with me as I figure all this stuff out. 

So I finally decided the best way to get this party started was to share with you how my interest in the world of nail polish was born & the answer to that is, my grandmother.  I don't even recall how young I was when I started with the whole nail polish thing but I know I had to be around 4 or 5 yrs old.  My grandmother always had her pointy nails painted and the color?  Yes you guessed it, that grandmother mauvey pinkish color.  :)  For the longest, that color range was the only one I ever knew existed for nails but that didn't matter.  I loved having such beautiful color extended to my fingertips so that I could stare at them.  I remember receiving some of that tinkerbell peelable nail polish when I was little.  I even remember when I started growing out my nails - I was in the 4th grade and I asked my mom for permission.  My interest in nail polish never waned but I would go through periods of time (years, sometimes months) where I wouldn't paint my fingernails.  When I got pregnant with my son and then after I had him, along with working outside of the home full time, it even got to a point where I didn't even paint my toes (yikes!).  However, what had started out as an interest has recently turned into an obsession when I discovered the world of Konad Nail Art Stamping and it has just exploded ever since.

Back to my grandmother - she is in her 90's, has alzheimers, but she still keeps her pointy fingernails painted.  The last time I got to see her (she lives in Alabama, I live in Kentucky), she had 3 bottles of nail polish sitting on the table next to her chair. :)

I hope to get some pics posted soon.  I can't promise that I'll be posting on a daily basis but I will post as often as I can.

Have a great day!
Related Posts Plugin for WordPress, Blogger...